Broiler alert
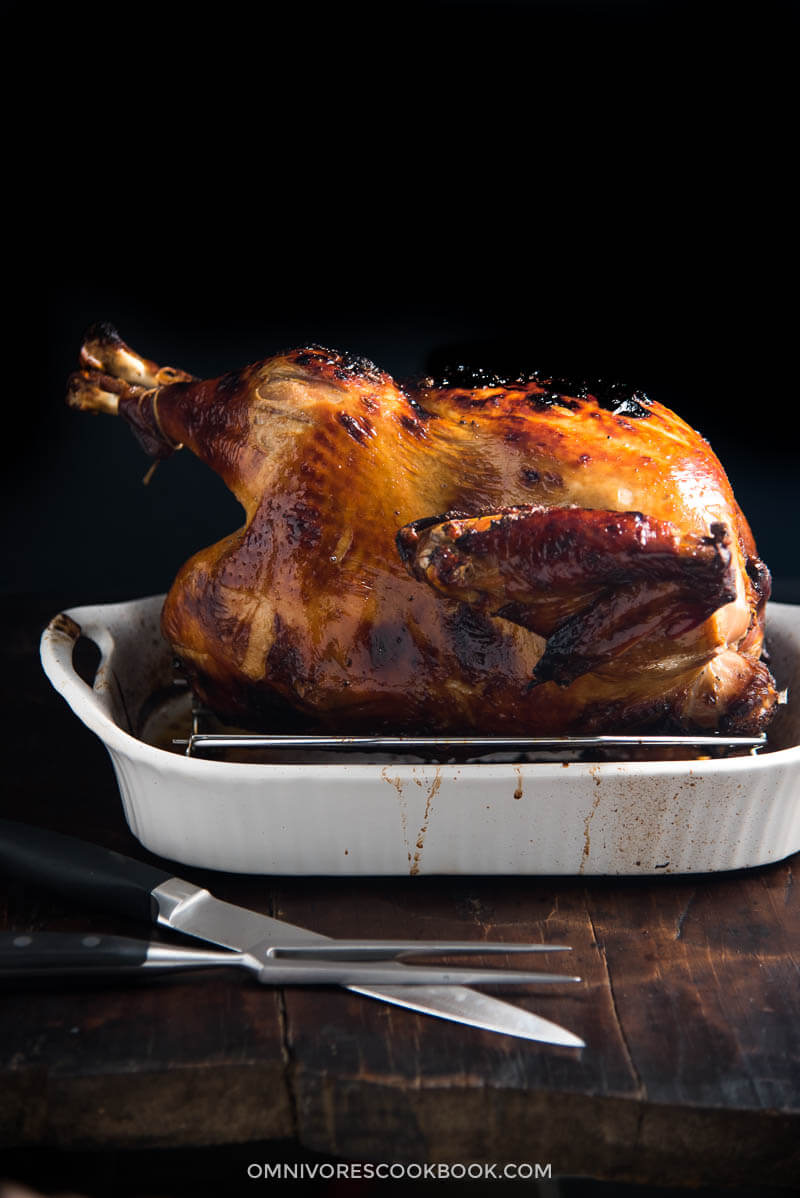
I burned my turkey. After 48 hours marinating, 3 hours of research and planning, and 2 hours of roasting, I was stirring the cranberry sauce with my right hand while checking the green beans with my left hand, thinking about the table decor and calculating the next dish to bake. The turkey in the oven was cooked but the breast side was not as browned as I hoped, so the broiler was on. One moment my eyes were on the bubbling cranberry sauce in the pan, starting to dry out, the next minute my fire alarm roared. Peeking through the oven door, the turkey breast had turned totally black. I panicked. And almost cried.
It was my first turkey and I’d spent many days preparing it. The first half of roasting went so well that I thought I’d nail the turkey dish in my first try. A moment of negligence ruined it all. Reality proved again that multitasking doesn’t work. The first thought that popped into my mind was to ditch the turkey into the trash can, cancel my yoga class, drive to Central Market and get a new turkey, and start all over again. The second I imagined doing turkey lifting and marinating for another two days, I almost cried again. (I have to confess, this is just occupational habit, although really bad one. When the food doesn’t look perfect, I don’t even want to try it before deciding whether it’s a successful dish or not. Because it’s not useable on the blog, no matter what, it equals a redo.) I was staring at the burned turkey and a tray of green beans waiting to be slided into the oven. Should I continue the photo shoot or not? Should I just carve the turkey and let go of my dreams of the whole bird hero shoot? Should I do it from the beginning again and take the photo another day? My mind struggled. Five minutes later, I decided. What the hell, I’ll try to shoot the turkey and see how it turns out. One hour later, after the turkey was properly rested and carved, I tried once piece and cried out, “OMG, this is the best turkey ever!”
I was so glad I didn’t threw it into the trash can.
Is brined turkey really better?
There is the great debate about whether or not to brine your turkey. A 4,000-word article nailed it down to three words – you should not. The argument is that even though brining does make the meat (especially white meat) juicier, brining waters down the turkey meat and make it taste less flavorful. My solution is – brine the turkey with a more flavorful liquid. Problem solved. Instead of using salty water, I chose to use an Asian flavor profile with soy sauce, oyster sauce, rice wine, ginger and garlic. It will create a very salty solution that is just like a brining mixture, but contains much more flavor. I was lazy so I used my good ol’ marinade for my Cantonese roasted chicken, and It worked out beautifully.
How to marinade (brine) with less liquid
To marinate a whole turkey without using bottles of soy sauce, I used the “fridge drawer & trash bag” trick. First of all, try to place your turkey (still in the packaging) into your fridge drawer (the bottom one that stores vegetables) to see whether it fits and you can still close your fridge door. If yes, you can use this method. This is the process:
The whole process requires a bit of effort (and helps you build your arm muscles). I did it because sauces are expensive and I don’t want to deplete my pantry just for a turkey. Of course, you can use more marinade to brine the whole bird and let the turkey sit in your fridge the whole time without touching it. To determine how much marinade you need for a whole bird, place the bird into the container (or fridge drawer) and add water to cover. Then take out the turkey and measure the amount of water left. The recipe below makes 4 cups (1/4 gallon or 1 liter) of marinade, so multiply the amount according to your needs.
How to roast a juicy bird that is crispy on all sides
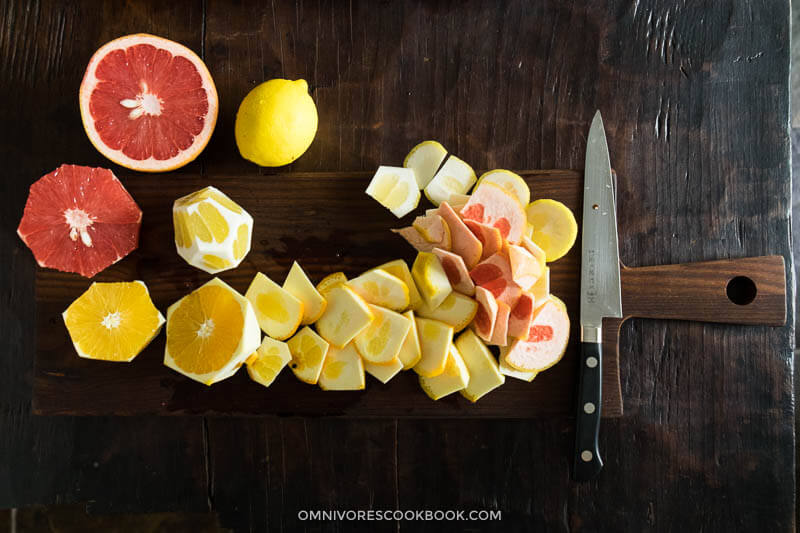
I’ve learned everything I know about turkey from this single post – the Step-by-Step Guide to the Best Roast Turkey created by The Yummy Life. It has the most clear and detailed instructions ever and the method is solid. I’ve documented my experience in this post, but make sure you go to the original post and read through it. Your Thanksgiving turkey will taste much better, starting from this year. To roast the best turkey, the number one rule is: Do not overcook it. …Which leads to another important point. You should NOT use turkey stuffing. Stuffed bird requires a much longer time to cook and the meat is more likely to dry out in the end. Here I used a method from my best slow roasted duck recipe – loosely stuff the bird with citrus. Not only do the fruits keep the meat juicy, they will also impart a nice aroma. This is a method used by a famous restaurant chef, that was then shared by one of my readers.
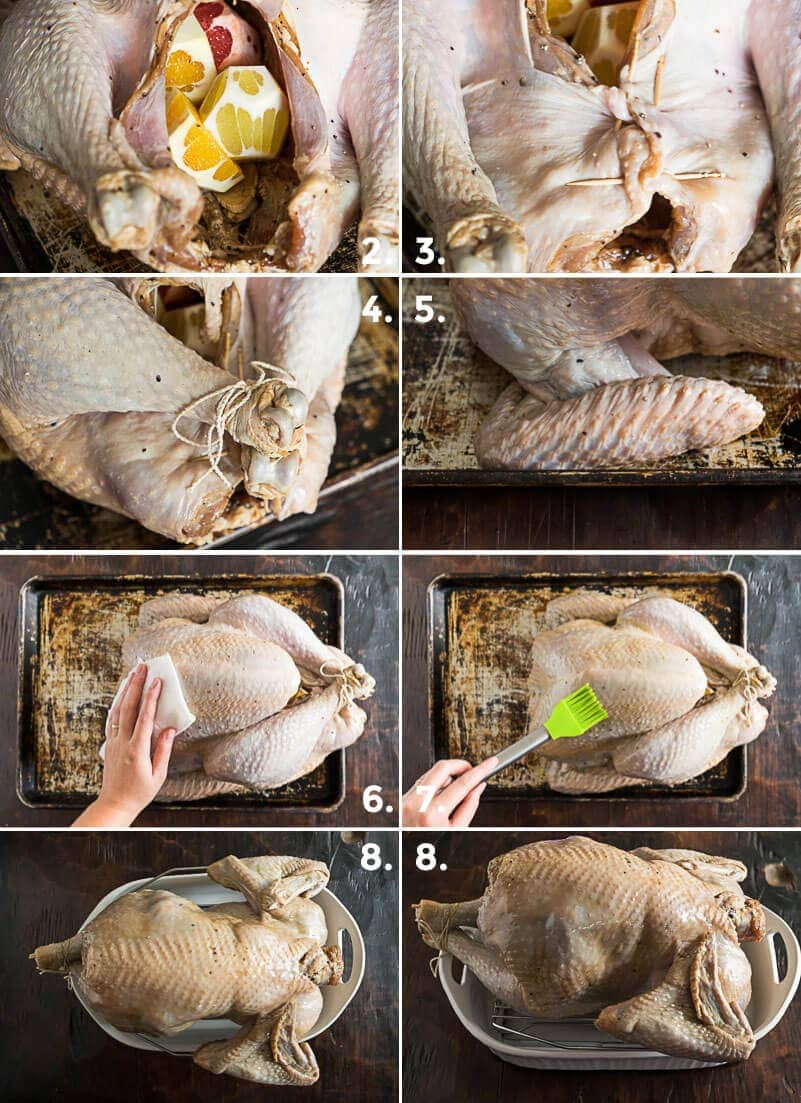
Here are the steps to prepare the bird before roasting:
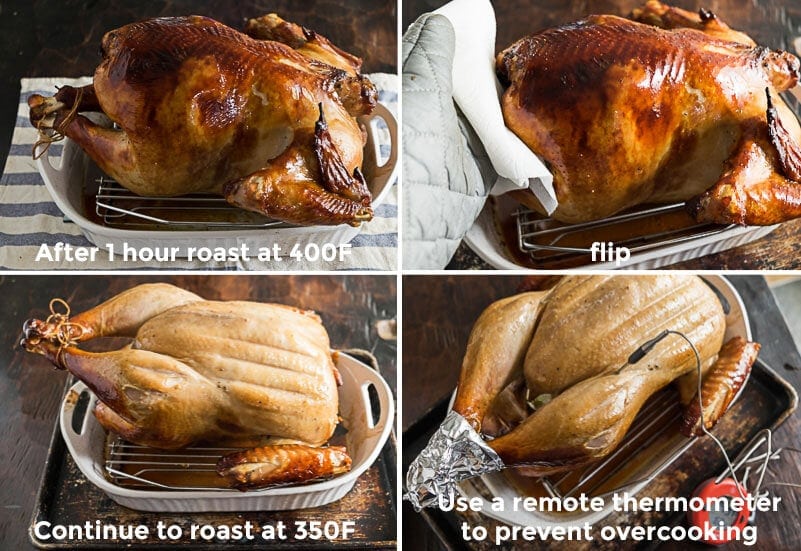
Now your turkey is ready for roasting. The next question is – what is the best temperature? I totally agree with the folks at The Yummy Life that low and slow doesn’t work for turkey. You should use a high enough temperature to crisp up the skin and properly cook through the bird at the same time. For a young turkey that is 14 to 16 pounds (6 to 7 kg), the recommended method is:
Roast, turkey back up, at 400 F (200 C) for 1 hour Lower the temperature to 350 F (180 C), bake for another hour, with turkey back up. Then flip the turkey to be faced breast-side up, bake at 350 F (180 C) for another hour or so.
However, I encountered a problem. I found my turkey was cooked way faster than expected. My 14-pound turkey was quite browned after the first hour of roasting at 400 F (partially because my oven rack lifts the turkey very high). The back was totally browned 20 minutes after I turned the temperature to 350 F. I flipped it to cook the breast side, earlier than the recommended 1 hour. But, the whole turkey was done after merely 40 minutes (and the total roasting time was 2 hours!). The breast side was not browned as I hoped, so I turned on the broiler to give it a final charred look which resulted in burned turkey breast skin… Later on, I found out other people had encountered the same issue – their turkey was cooked too fast. My assumptions are that your true oven temperature, the type of bird, preparation method, and baking equipment all affect the roasting time. My solution is to:
Roast the bird back side up at a high temperature 400 F (200 C) for an hour. Lower to 350 F (180 C), and keep cooking until the turkey back is browned. You should flip it to bake the breast if the back is already browned at this point. Keep baking at 350 F (180 C) until the whole bird is cooked through.
When you start to cook with the breast side up, I highly recommend you to use a remote thermometer to measure the thickest part of the thigh, to make sure the bird won’t be overcooked. Once the roasting is done, you should use an instant thermometer to measure both thighs and breasts, to make sure every part is cooked to 165 F, the recommended safe temperature by USDA. A temperature beyond 165 F (74 C) yields dry and tough turkey meat.
Conclusion
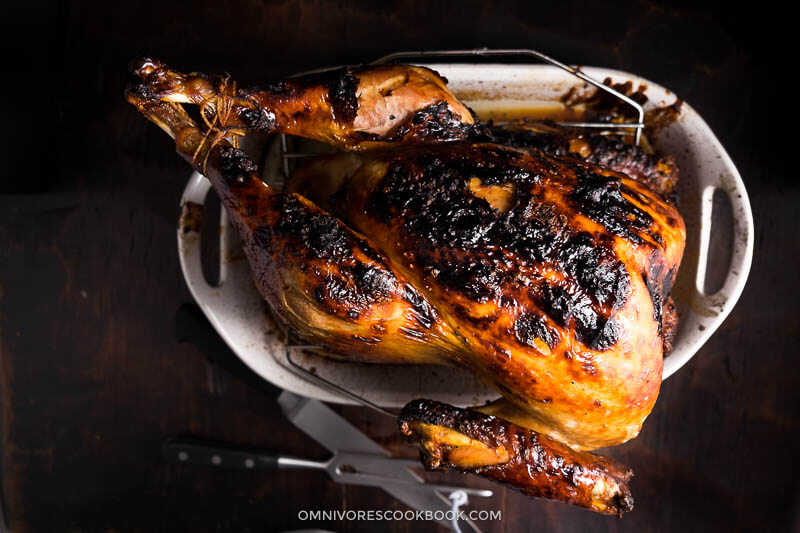
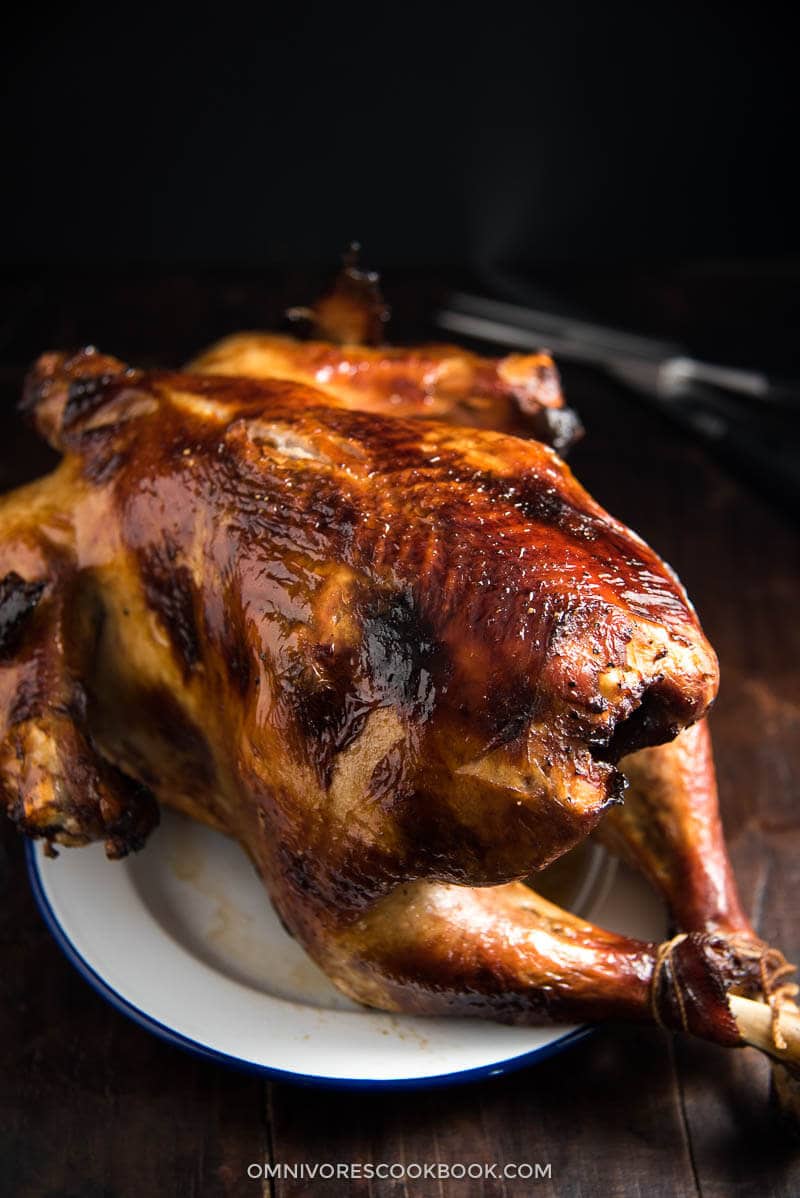
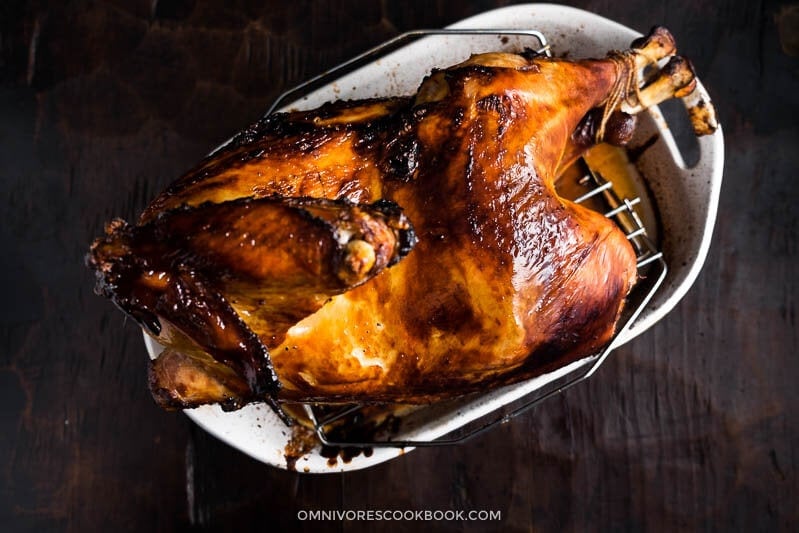
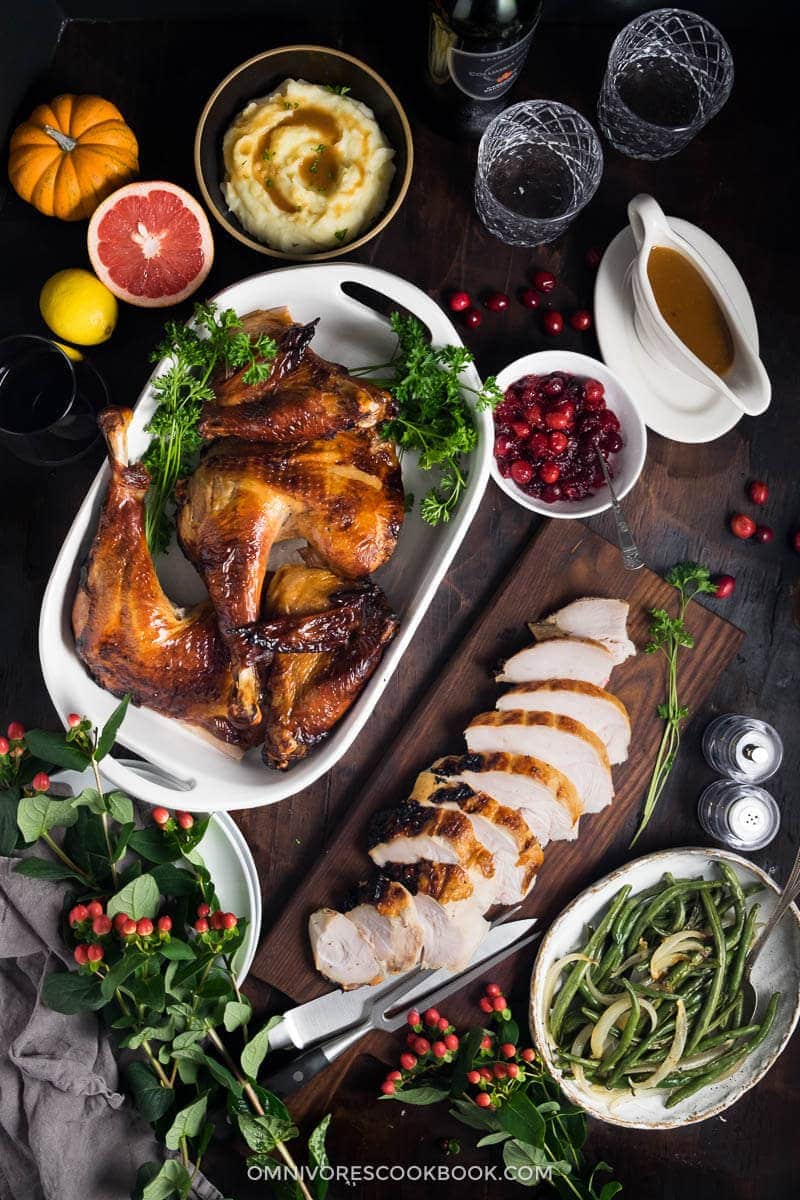
Despite the fact that I ruined the turkey breast skin at the last minute, I considered my first turkey as successfully done. I know it’s strange to say this, but it’s the sexiest turkey back I’ve ever seen. I have a thing for crispy poultry skin, so this method is a treasure to me.
The breast meat was extra juicy and flavorful, and even the leftover meat was tender after reheating.
The legs and thighs were the best because they crisped up perfectly, on ALL sides.
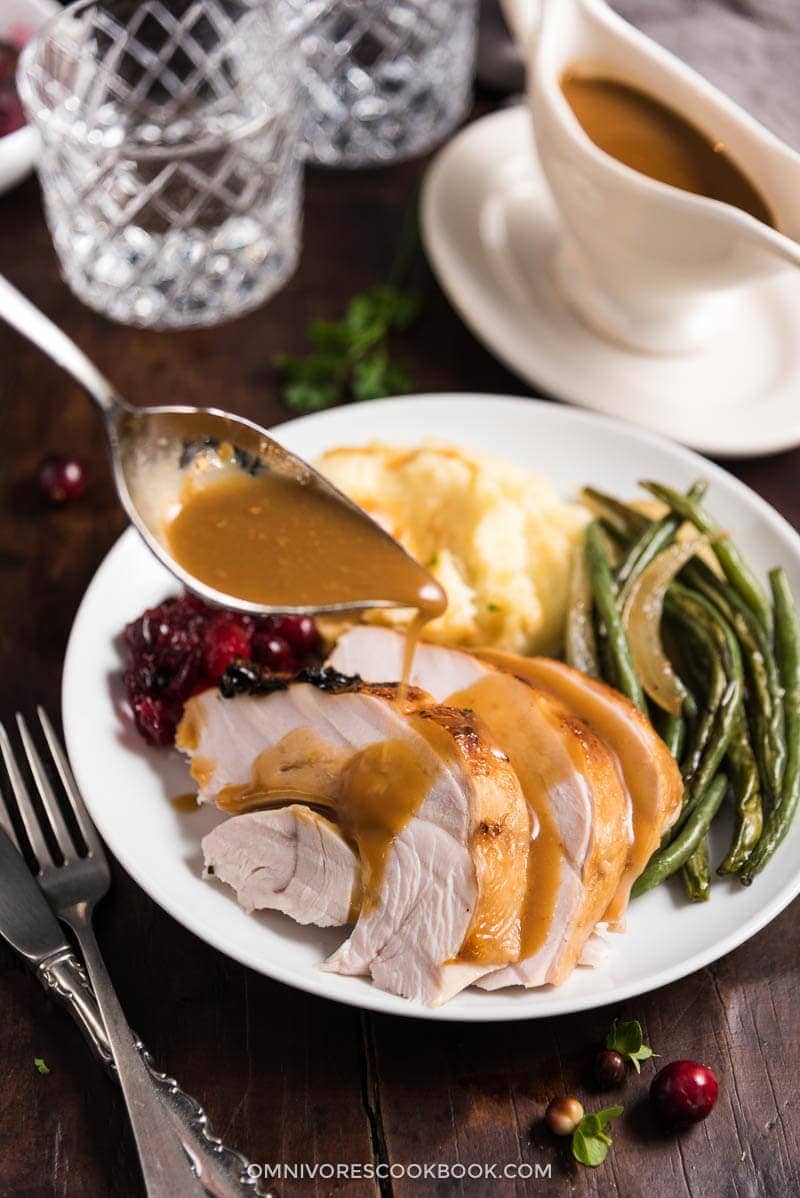
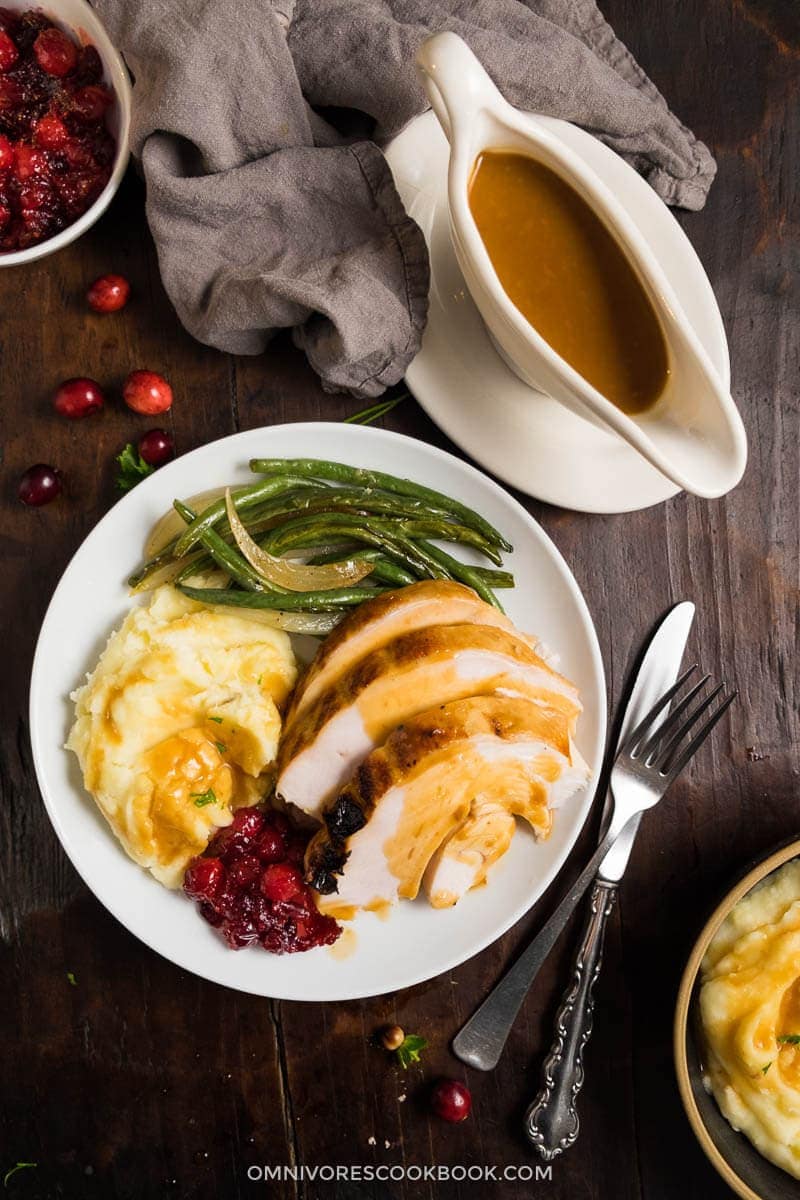
The turkey meat was delicious enough by itself. It also goes very well with a sweet sauce, such as traditional cranberry sauce, or sweet Thai chili sauce. The two-day marinating was well worth the effort because I ended up with one of the best turkeys I’ve ever had. The only downside of the marinating method is that the gravy will end up tasting salty. I diluted the pan drippings with same amount of plain chicken stock, but the gravy was still quite salty. If you still want to serve the turkey with gravy, make sure to dilute it with more plain stock.
Serving suggestion
Side dish 1: This turkey definitely goes well with steamed rice, but you can serve it with classic mashed potato and gravy too. Side dish 2: Do serve the turkey with oven roasted green beans garlic soy glaze. Cranberry sauce: Making it from scratch is much easier than you think. Thai sweet chili sauce or hoisin sauce (or homemade hoisin sauce) is a great option too. How to carve a turkey: Here is a video, or you can read this post. How to use the turkey bones and carcass: Make stock by using this method, and simply replace chicken bones with turkey bones.
That’s it! It is a long post, but I hope it helps you in the kitchen.
If you give this recipe a try, let us know! Leave a comment, rate it (once you’ve tried it), and take a picture and tag it @omnivorescookbook on Instagram! I’d love to see what you come up with. Happy cooking and have a fabulous holiday everyone!!