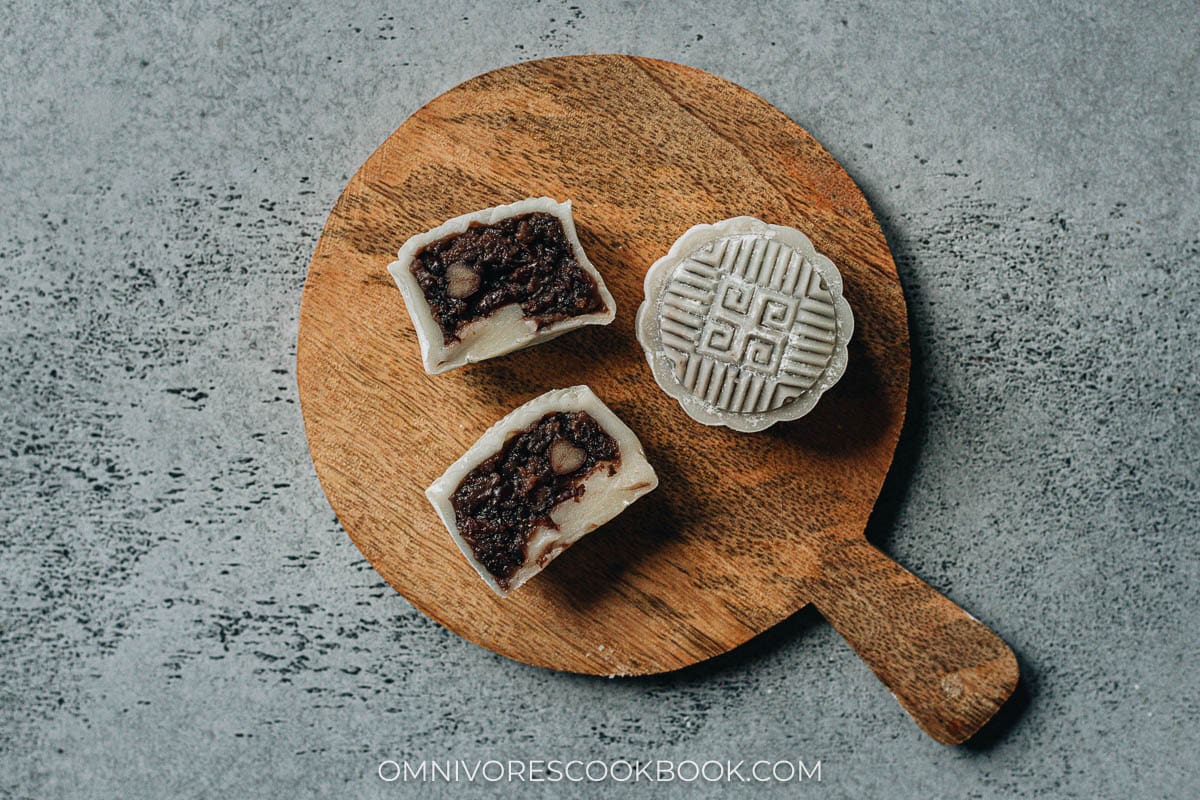
Mid-Autumn Festival is just around the corner and it’s that time of the year that families start to buy or make their favorite mooncakes. In the past, the baked traditional mooncake was the staple to celebrate the festival. But these days, there are many different types of modern mooncakes that people love to enjoy. For example, these round pastry mooncakes filled with red bean paste and salty duck egg yolks. Today, I want to share this snow skin mooncake with a custard filling recipe. Snow skin mooncake is a new type of mooncake that’s gradually gaining popularity in recent years.
What is a snow skin mooncake?
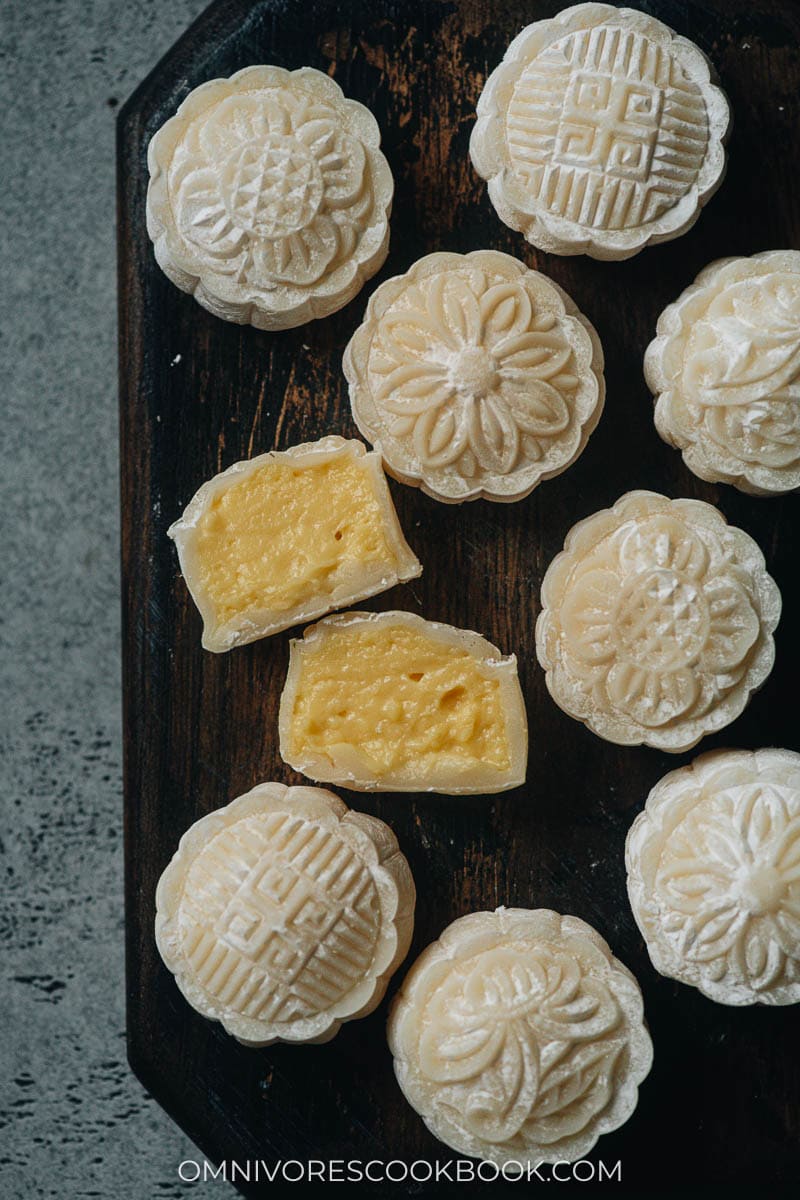
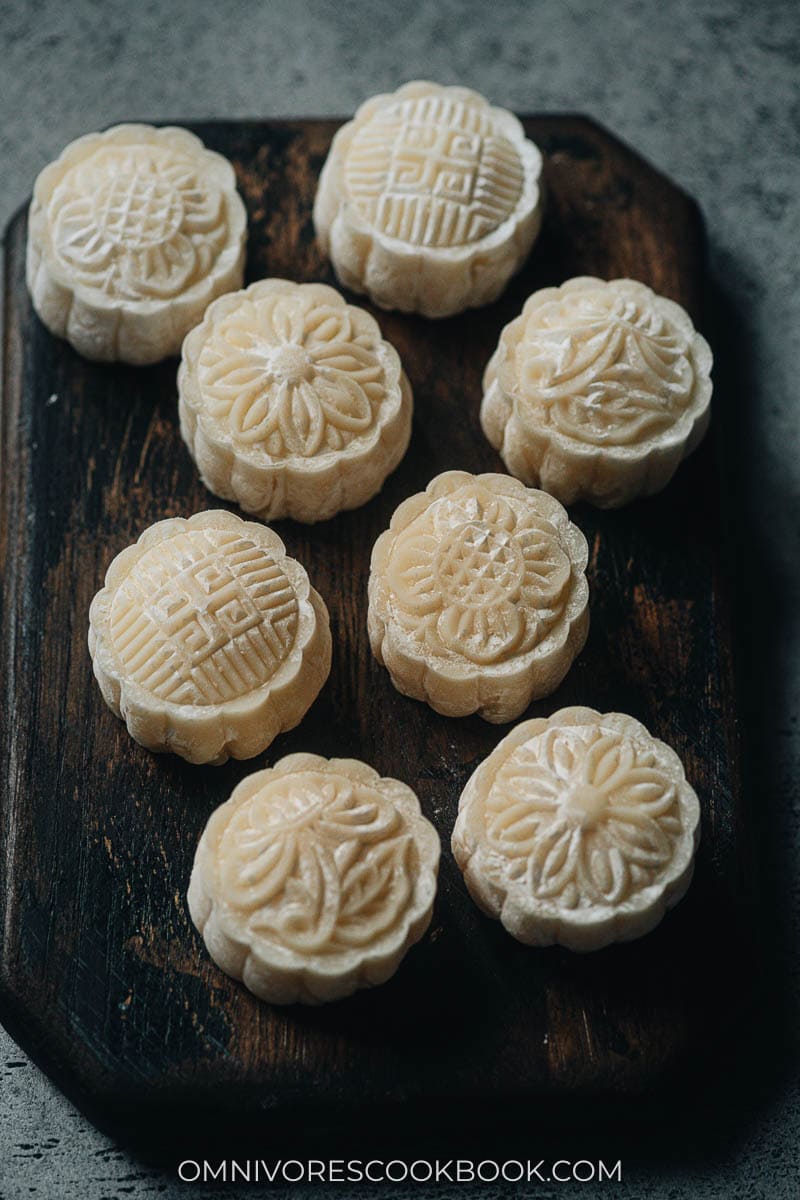
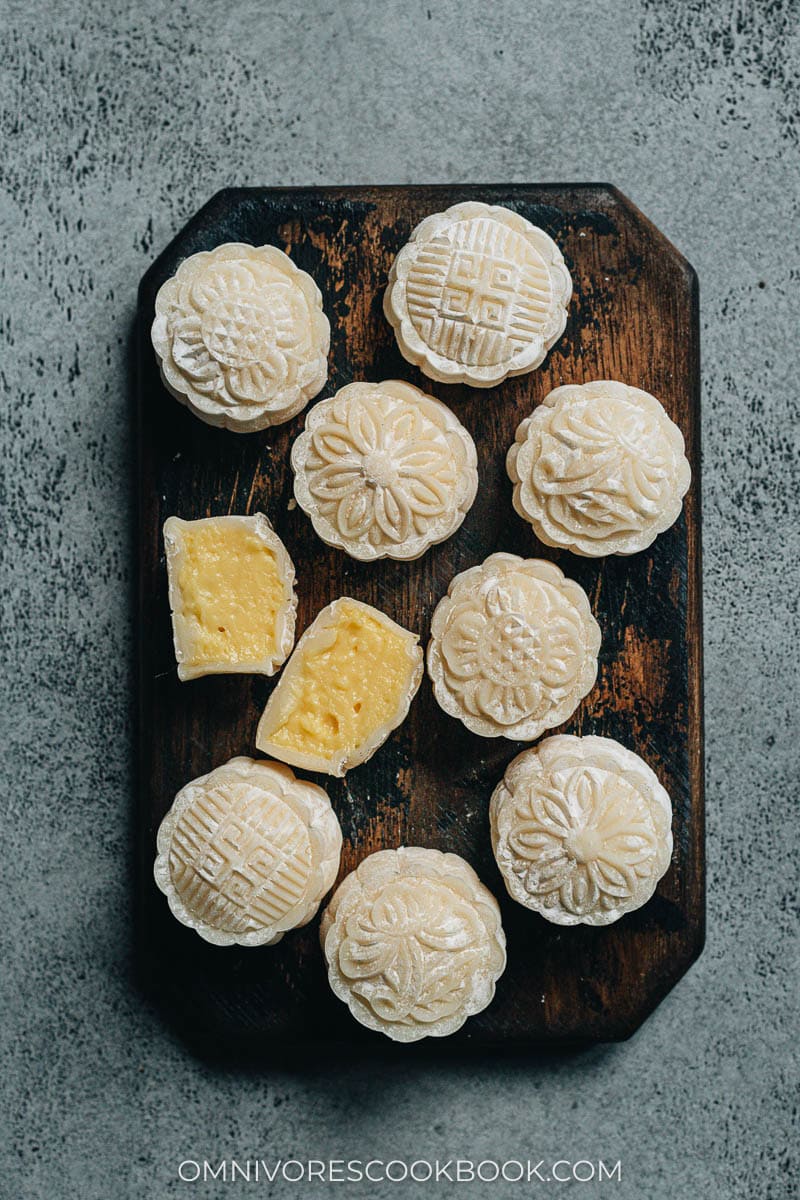
“Snow Skin” is translated from the Chinese “Bing Pi” (literally meaning “Icy Skin”). The word snow is used because of the color and texture of the mooncake wrapper. Different from the traditional baked sugary pastry, the snow skin mooncake is made with a mochi-like dough and usually served chilled. Sometimes people also call it a mochi mooncake. Just like regular mooncakes, snow skin mooncakes can be filled with red bean paste, black sesame paste, lotus seed paste, and other sweet fruity fillings. In this recipe I will be using a custard filling. Buttery, milky and creamy, it’s one of my favorite fillings to enjoy snow skin mooncake.
How to make snow skin mooncake
1. Prepare the custard filling
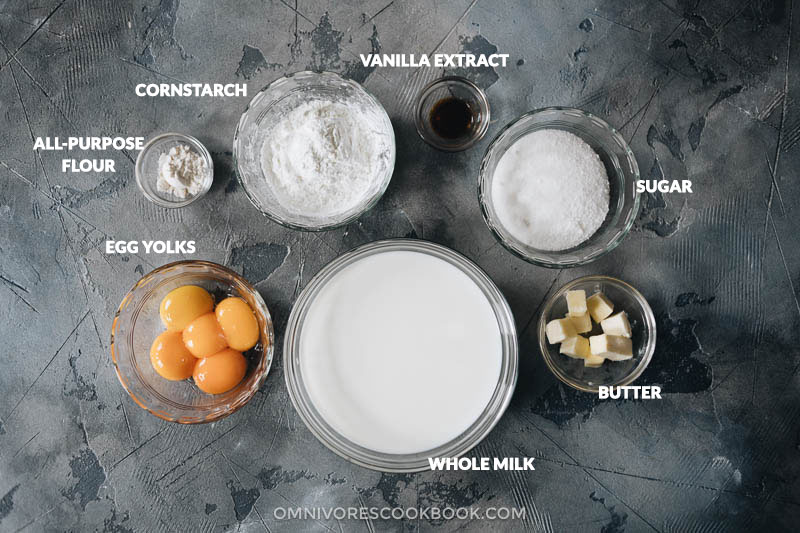
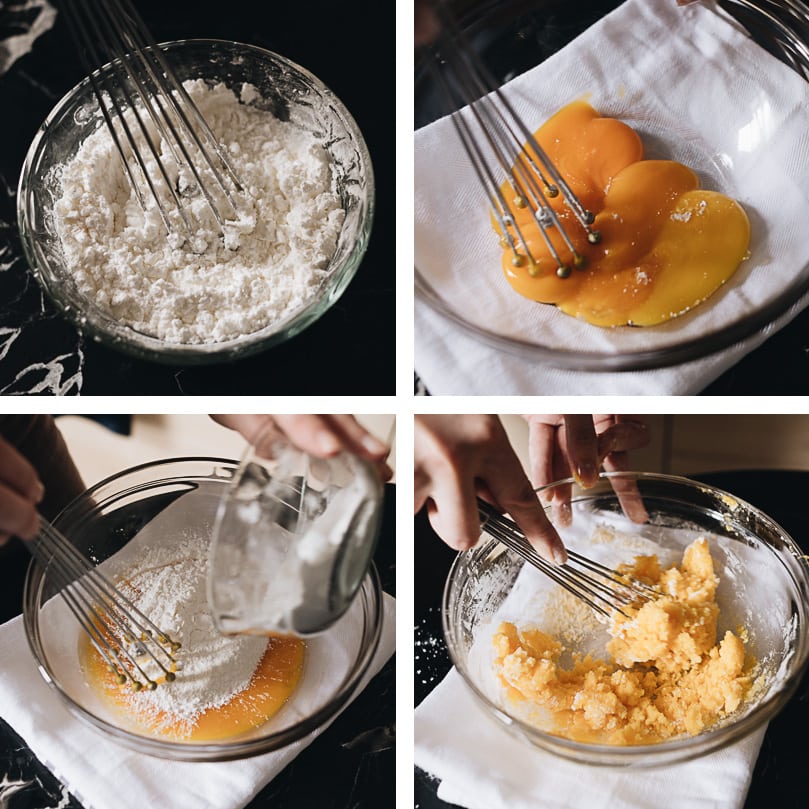
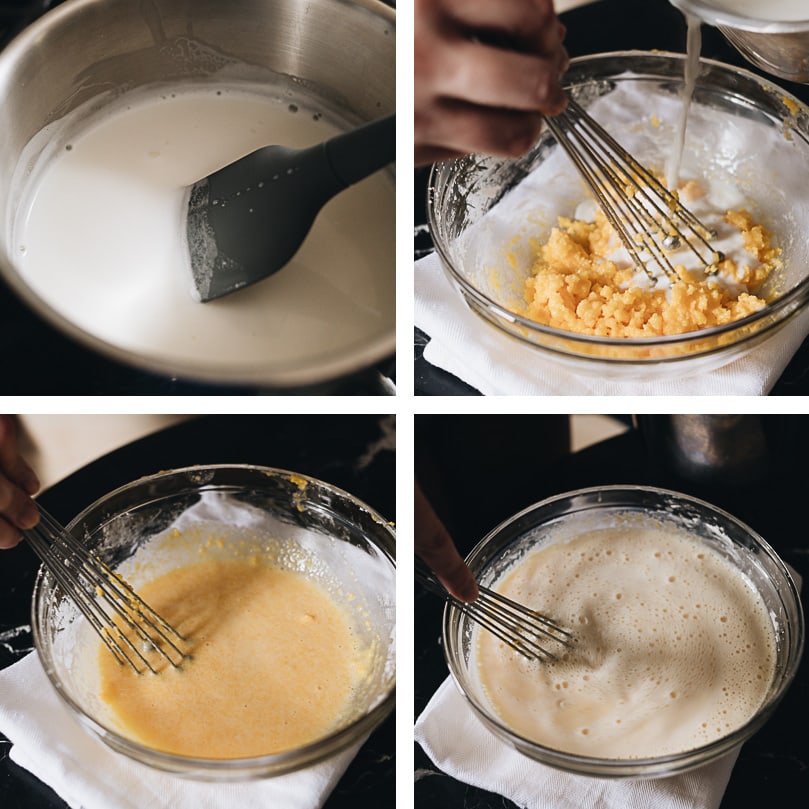
This recipe uses a standard custard recipe as the base. It contains more flour than regular custard so it is easy to form the mooncakes. It uses 7 ingredients that are shown in the picture below. The workflow is: Note:
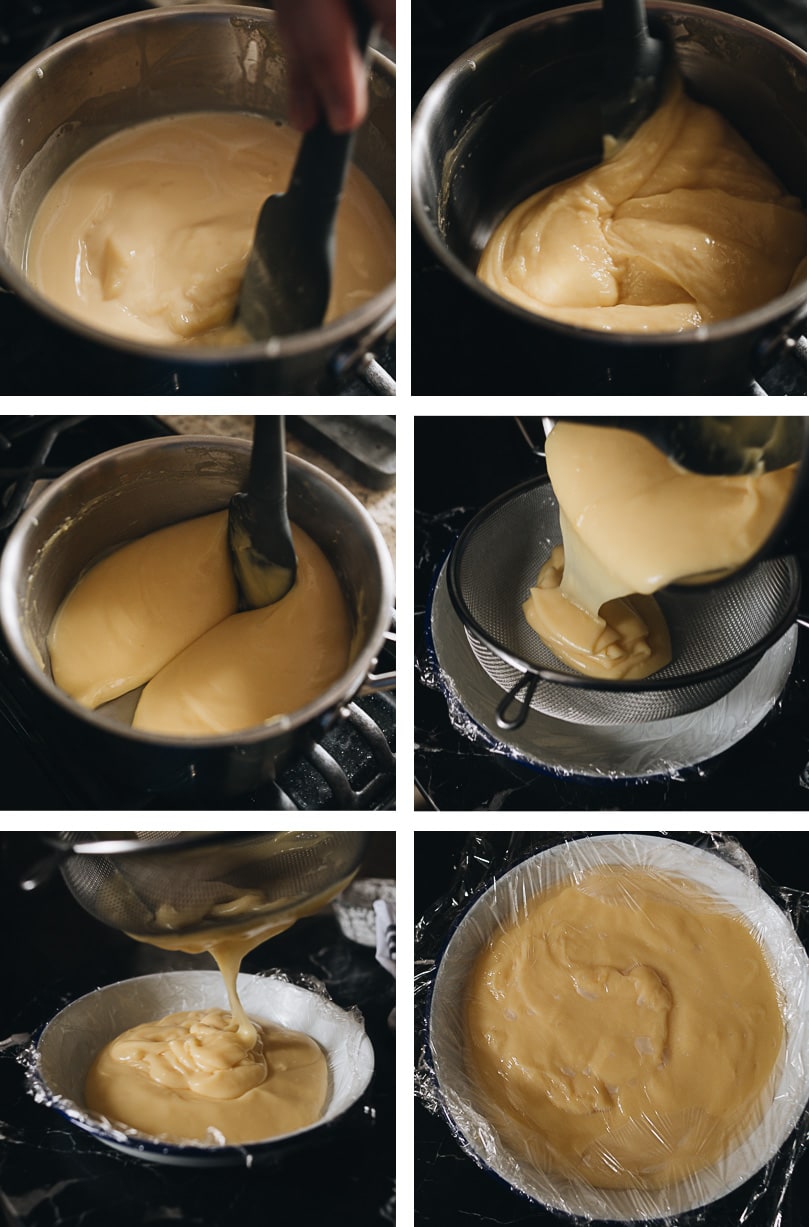
Make sure you don’t overheat the milk, otherwise it will cook the eggs and make the filling into a lumpy soup. I usually use a thermometer to make sure the milk doesn’t heat over 150 F (65 C). If you do not have a thermometer, you should heat up the milk over low heat until it’s warmed up but not too hot if you put your finger into the milk. Do not mix the egg yolks with the dry ingredients before you heat up the milk. The sugar will cook the egg yolk and change its texture if added too early. Stir the custard constantly when you heat it up on the stove. The mixture will be very runny at the beginning and will take a few minutes to cook. But once it starts to thicken, it happens very fast, like flipping a switch. Once the custard starts to bubble, make sure to stir constantly and let it cook boiled for 1 full minute. This will make sure the flour is cooked thoroughly, so the custard will be able to thicken up once chilled. Chill the custard completely before forming the mooncake. The texture will harden and become possible to shape once cooled.
2. Prepare the dough
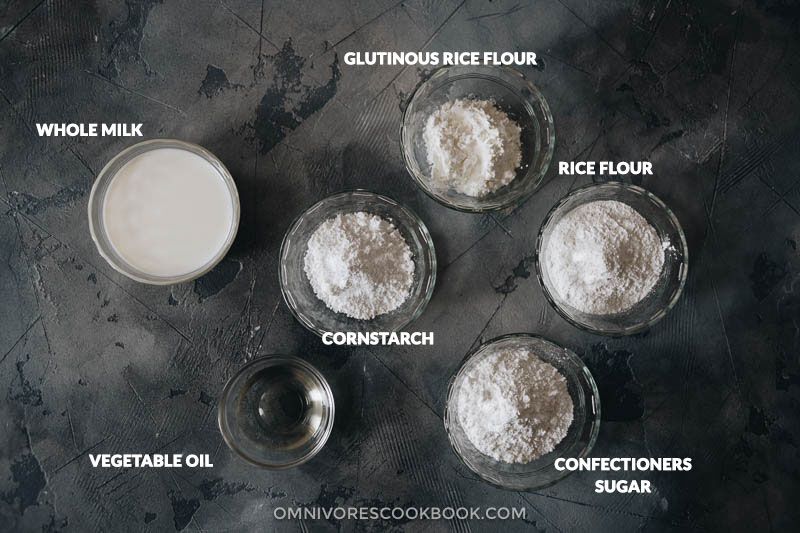
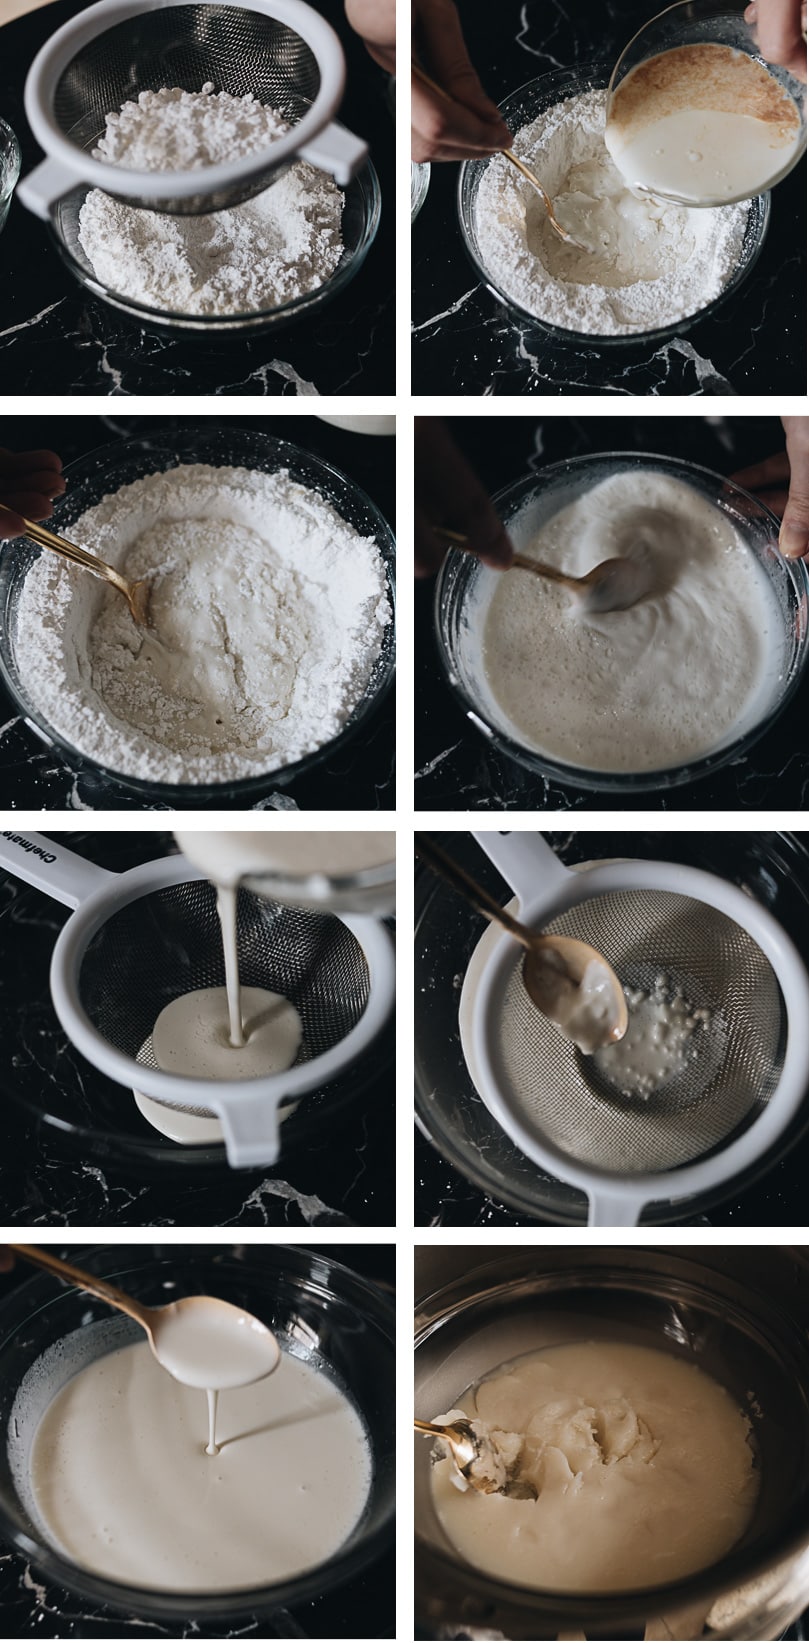
The dough uses 7 ingredients that are shown in the picture below. The workflow is: Note:
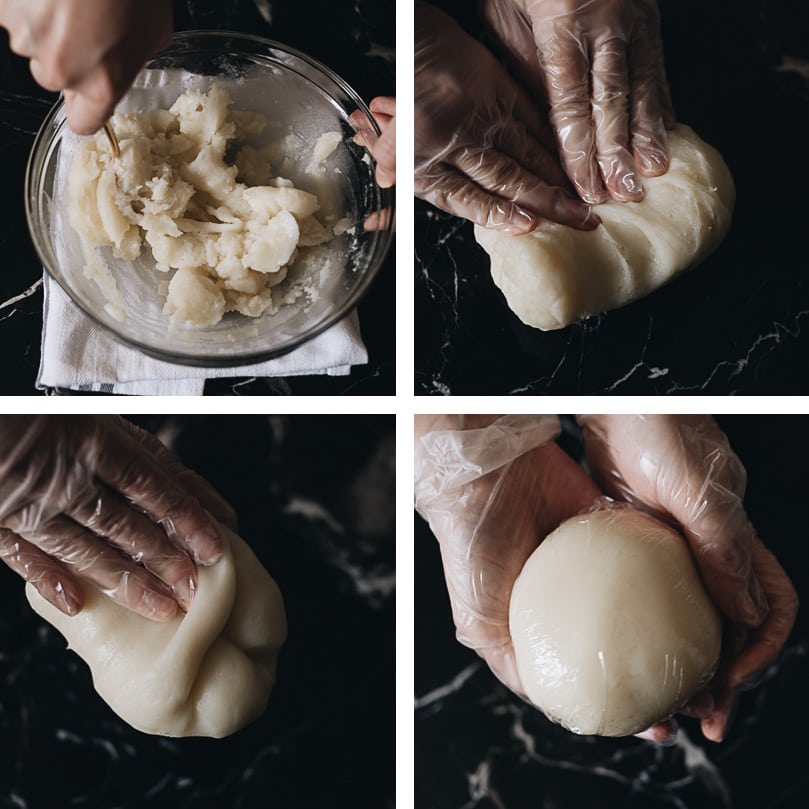
You can add different extracts into the dough. Almond, rose, and pandan extracts all work in this recipe. You can add food coloring into the dough. Many recipes use a few drops of red or green food coloring to make pink and pale green mooncakes. Knead the dough once it’s steamed. The texture of the dough will soften a lot and become more palatable once kneaded. Chill the dough in the fridge for at least 30 minutes, so it hardens up a bit for the molding. It’s possible to make the dough ahead of time and chill it overnight. But we’ve found that the freshly made dough is easier to mold and tastes slightly better.
3. Make dough and filling balls
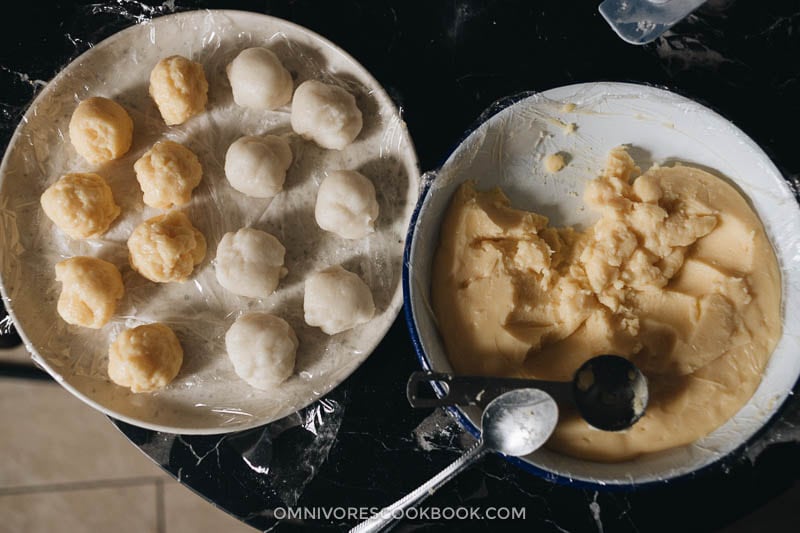
Once you’ve chilled the custard, mix it well with a spatula. This will help the custard to even out and make it easier to shape. You might find the custard is quite soft and stick to your hands when shaping them. I highly recommend wearing a pair of disposable gloves, and slightly grease it with oil. It will make the custard much easier to shape. Shape the custard and the dough into balls. And once you shape the custard into balls, immediately cover with plastic wrap and store in the fridge so it stays cool and firm. The easiest and most consistent way is to use a scale to measure out the portions. But if you don’t have a scale, you can use a tablespoon to measure one round tablespoon of dough and one round tablespoon of filling. In this recipe, I used 25 grams of filling and 25 grams of dough. For the dough, I measured out a bit more dough to make a larger wrapper, so it’s easier to assemble the mooncakes. Once you wrap the mooncake, it will form more dough on top where you seal the filling. You can pinch off the extra dough so the mooncake skin will be even and thin throughout. It eventually makes a 45-gram mooncake (25 grams of filling + 20 grams of dough).
4. Assemble the mooncakes
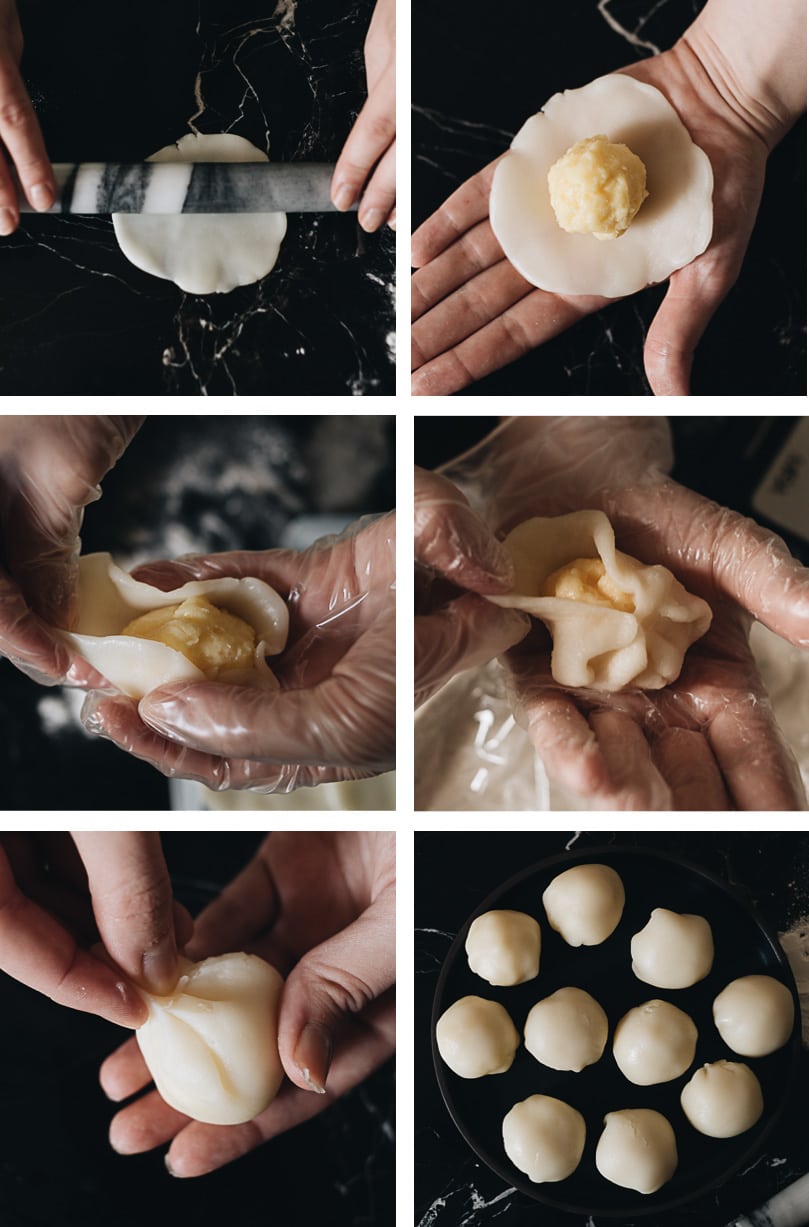
To assemble the snow skin mooncakes, you need to: Note:
You can use your hands to form the wrapper as well. Although I found that a rolling pin yields a thinner and more even wrapper. Do NOT dust your working surface with extra flour. The dough contains enough oil so it won’t stick to your working surface easily. Adding extra flour will change the texture of the dough. You can wear a pair of disposable gloves when you work on the mooncakes. Personally I like to shape the dough using my hands.
5. Mold the mooncake
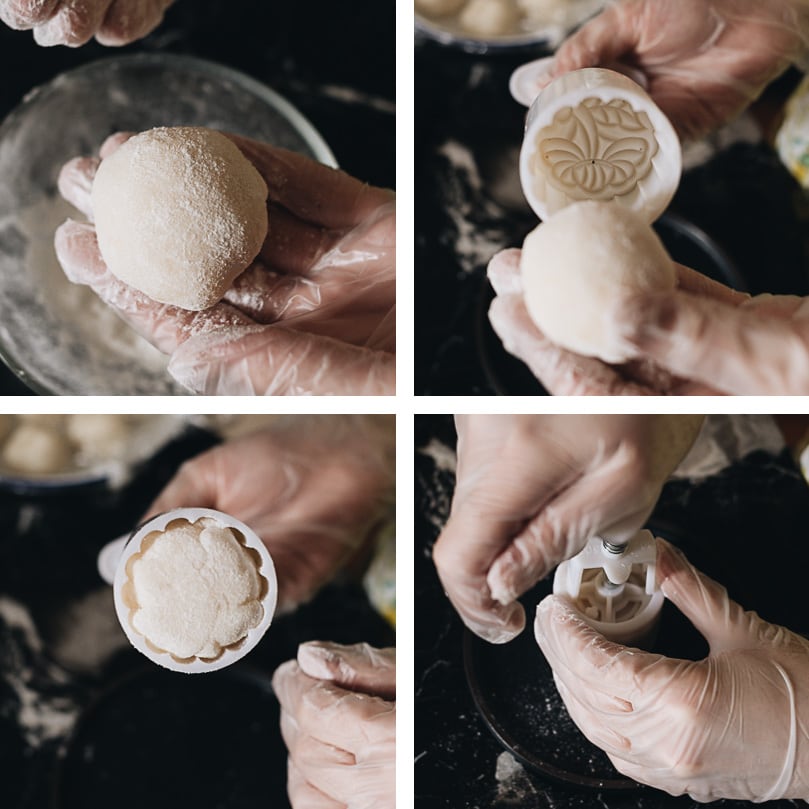
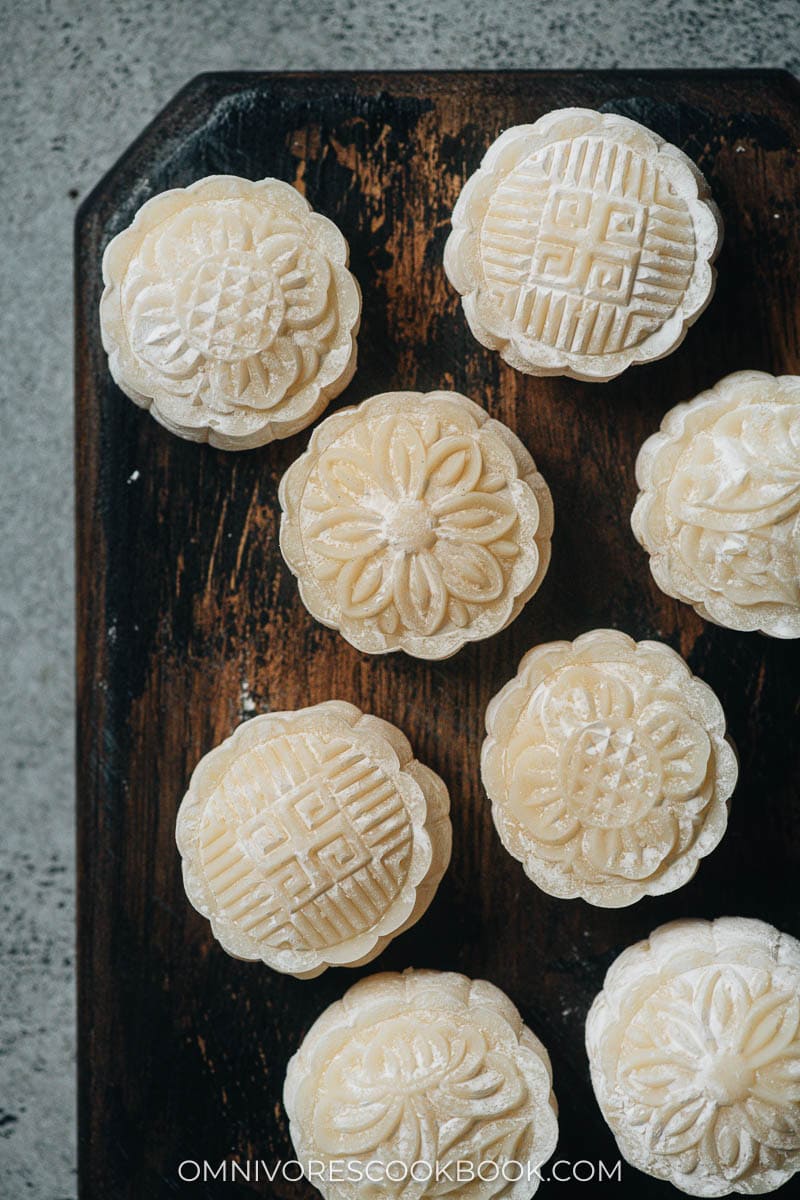
To speak the truth, the “mochi” you’ve made at this point is kinda ready to eat and tastes delicious. But of course, you’ll need to mold them into beautiful patterns to call them mooncakes. To mold the mooncake, you need to: Note:
Ideally, you should be using Gao Fen (cooked glutinous flour) to dust the mooncake. But since it’s hard to find, most recipes ask you to cook the glutinous flour in a pan for the coating. I found that step unnecessary because cooking the flour doesn’t eliminate its powdery raw taste. I used cornstarch to coat the mooncake, which is the approach usually used in mochi recipes. The pattern on the mooncake will fade a bit over time, which is unavoidable for any type of snow skin mooncake. Store-bought mooncakes use additives and are sometimes frozen to keep the mooncake in a perfect pattern. That’s why homemade ones might look less perfect, but they actually have a much better taste than the store-bought ones.
Frequently asked questions
Why does my custard turn out too soft and I can’t shape it after chilling?
Make sure you bring the custard mixture to a boil (it should be bubbling if you stop stirring it for a moment), and let it boil while mixing it for a full minute. This is the key to make sure the custard is properly cooked and will firm up once chilled.
Why does the mooncake skin harden once I stored it overnight in the fridge?
The mooncake skin will harden when it’s cooled. The best way is to let the mooncake rest at room temperature so the skin will turn a bit softer before eating. If you do not plan to serve the mooncake the same day, I would keep them refrigerated in the wrapped ball form without molding them. You can mold them the next day before serving. So the patterns will stay more clear, and the mooncake skin will soften a bit too.
The custard and the dough are too sticky and hard to work with. Should can I do?
The best way is to wear disposable gloves while working on the cooked dough and the filling. It keeps them from sticking and makes the workflow much smoother. I hope you enjoy the recipe! Make sure you check out the video if you’re not familiar with the process. It is indeed a challenging project but the result is so rewarding!
More recipes for Mid-Autumn Festival
Traditional Mooncake with Black Sesame Filling Dan Huang Su (Pastry Mooncake with Salty Egg Yolk, 蛋黄酥) Homemade Lotus Seed Paste (莲蓉馅) Mid-Autumn Festival Menu How to Make Red Bean Paste How to Make Shumai (烧麦, Steamed Dumplings) How to Make Chinese Dumplings from Scratch
The recipe was published in 2019 and updated in 2023 with a new video. I also slightly changed the dough recipe so it is easier to shape. The custard steps are clarified to solve the issue that it’s hard to shape after chilling. Lilja Walter was a part of the Omnivore’s Cookbook team and worked closely with Maggie to develop and test this recipe.